Navigation
In this article we will cover how to do navigation in a NativeScript application using Angular and will provide some practical examples of common mobile navigation patterns.
The Angular way of doing navigation is using the Angular Component Router. You can check this detailed guide on how to use the router. In this article we will assume that you are familiar with the basic concepts and will concentrate on the specifics with the implementation in a NativeScript app.
NativeScript Router Module
NativeScript provides its own NativeScriptRouterModule that extends the Angular RouterModule. It contains some extensions and additions that are essential for routing to work in a mobile environment and also provide options to bring the full native mobile navigation UX to Angular.
There are a number of UX specifics that are hard to replicate with the default Angular router alone:
- Native navigation transitions.
- Back navigation handling - the hardware back button on Android and the navigation bar back button on iOS.
- Mobile navigation lifecycle - view state preservation when navigating back.
- Mobile specific history - keeping history per navigation controller instead of a global one.
- Mobile lateral navigation widgets -
BottomNavigation,Tabs,SideDrawer,Modal Viewand more.
NativeScript brings these to Angular with the following extensions, directives and strategies:
-
page-router-outlet- this is an alternative to the regularrouter-outletthat serves as a placeholder for where native mobile navigation will occur. -
nsRouterLink- it's an alternative to the regularrouterLinkdirective that works with mobile gestures. -
RouterExtensionsclass - It provides a native mobile navigation API similar to theRouterandLocationclasses. - Custom
RouteReuseStrategy- this strategy forces Angular to cache and reuse components that were loaded in apage-router-outletwith accordance to the native navigation lifecycle. - Custom
PlatformLocationandLocationStrategy- this strategy keeps history per outlet instead of one global linear history.
We will explore each of these in the following sections.
Page Router Outlet
NativeScript's page-router-outlet is the equivalent of Angular's router-outlet. It serves as a placeholder for native mobile navigations. Internally, each page-router-outlet creates a NativeScript Frame and each component that the router displays in the outlet is wrapped in a Page widget. This is the main integration point that brings native navigation to Angular. The Frame and Page combination also means you can use the ActionBar widget in these components. For more information on how NativeScript Core navigation works visit this documentation article.
We recommend that you use page-router-outlet for your major mobile navigation pattern and use the regular router-outlet for internal component navigations if needed. You are also free to use only the router-outlet if this makes more sense for your scenario.
Router Link
In a NativeScript application you cannot use the Angular routerLink directive. NativeScript provides its own nsRouterLink directive that is working much in the same way. Additionally, it supports two NativeScript specific attributes that you can add to your nsRouterLink tag in the markup.
- pageTransition - This attribute lets you specify the native transition for the
nsRouterLinknavigation. Accepted values aretrue,false, one of the predefined transitions listed here or a custom NavigationTransition object. - clearHistory - This attribute accepts a boolean value and indicates whether the navigation triggered by the
nsRouterLinkwill clear the navigation history of the current outlet.
<Button text="Button" [nsRouterLink]="['/main']" pageTransition="slide" clearHistory="true"></Button>
Note: The NativeScript specific attributes work only on routes loaded in a
page-router-outlet.
Router Extensions
The RouterExtensions class provides methods for imperative navigation, similar to how you would navigate with the Angular Router and Location classes. To use the class simply inject it in your component constructor:
import { RouterExtensions } from "nativescript-angular/router";

@Component({
    // ...
})
export class MainComponent {

    constructor(private routerExtensions: RouterExtensions) {
    }
}
Here is a list of the available methods:
-
navigate()- this method is an alternative to the AngularRouternavigate()method, but also supports navigations in apage-router-outlet. -
navigateByUrl()- like the above method, this is an alternative to theRouternavigateByUrl()method that works withpage-router-outlet. -
back()- this method is an equivalent to the AngularLocationback()method. It will navigate back in the last navigated outlet. -
canGoBack()- this is a method introduced by NativeScript. It returns a boolean value indicating whether there is a route the user can navigate back to. -
backToPreviousPage()- this method is similar to theback()method above, but it will skip navigations done in an Angularrouter-outlet. -
canGoBackToPreviousPage()- this method returns a boolean value indicating whether there is a route that was loaded in apage-router-outlet, that the user can navigate back to.
Custom Route Reuse Strategy
NativeScript also imports a custom RouteReuseStrategy that changes the lifecycle of components navigated in a page-router-outlet.
In the Angular router-outlet, a component is destroyed when you navigate away from it and is re-created when you navigate back to it. There is no difference in the component lifecycle between forward and backward navigation.

In a native mobile application the system will keep the navigated views alive, so that when you come back to them, their view state will be kept the same. Views are destroyed only when you back away from them. The page-router-outlet houses native navigations, so its components lifecycle must match the lifecycle of the native views. This is done by the custom NSRouteReuseStrategy.

You might want to perform some cleanup actions (e.g. unsubscribe from a service to stop updates) when you are navigating forward to a next page. If you are using page-router-outlet you cannot do that in the ngOnDestroy() hook, as this will not be called when you navigate forward. What you can do is to inject the Page instance inside your component and attach to page navigation events (for example navigatedFrom) and do the cleanup there. You can check all the available page events here.
Configuration
The router configuration usually consists of the following steps:
Create a RouterConfig object which maps paths to components and parameters:
export const routes = [
    { path: "login", component: LoginComponent },
    { path: "groceries", component: GroceryListComponent },
    { path: "grocery/:id", component: GroceryComponent }
];
Use the NativeScriptRouterModule API to import your routes:
import { NativeScriptRouterModule } from "nativescript-angular/router";

@NgModule({
    bootstrap: [GroceriesApp],
    imports: [
        NativeScriptRouterModule,
        NativeScriptRouterModule.forRoot(routes)
    ]
})
export class GroceriesAppModule { }
As usual, pass your module to the bootstrapModule function to start your app:
import { platformNativeScriptDynamic } from "nativescript-angular/platform";
platformNativeScriptDynamic().bootstrapModule(GroceriesAppModule);
Mobile Navigation Patterns
Navigation refers to the act of moving around the screens of your application. Each mobile app has its own unique navigation schema based on the information it tries to present. The schema below is an example of a common mobile navigation scenario.
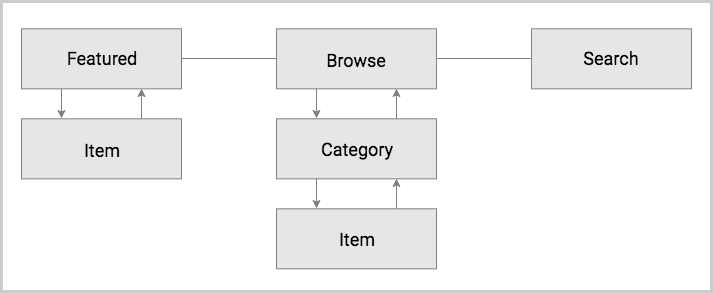
From a mobile navigation point of view and based on the schema, there are three distinct navigational directions a user can move in:
- Forward - refers to navigating to a screen on the next level in the hierarchy.
- Backward - refers to navigating back to a screen either on the previous level in the hierarchy or chronologically.
- Lateral - refers to navigating between screens on the same level in the hierarchy.
The combination of NativeScript and Angular is very powerful in terms of navigation options. Angular brings its own well known navigation mechanism with a router. NativeScript on the other hand provides access to the native mobile navigation patterns. Due to the nature of the integration between the two, you have a choice to use either of them or even a combination that suits your needs. In the following sections we will provide implementation examples to various mobile navigation patterns.
Note: To improve the bootstrap time and the in-app navigation in large applications, Angular has introduced lazy loading for modules. Refer to the Lazy Loading in NativeScript for detailed explanation and implementation steps. We won't use this feature in the following examples for the sake of simplicity.
Angular Navigation
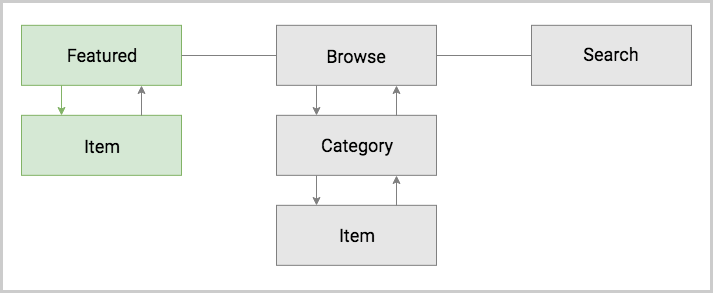
The default Angular navigation is tailored for the web where you navigate using a browser. On its own, it provides only mechanisms for forward and backward navigations, no lateral. However, there is a way to implement the above schema only going forward and backward. Here is an example diagram.

In mobile terms this is called the hub navigation pattern where you have a screen that navigates to all the various features of your application.
We are going to use a router-outlet combined with the nsRouterLink directive and the Angular Location class back() method. The code sample below demonstrates only two of the components. For a complete example visit the playground demo below.
Note: Note that using the
router-outletmeans we cannot use theActionBarwidget. For iOS this means there will be no automatic native back button in it. On Android, the hardware back button won't back in your routes by default. It will close the app instead. We recommend that you use NativeScript'spage-router-outlet. We will demonstrate this in the next sections.
import { NgModule } from "@angular/core";
import { Routes } from "@angular/router";
import { NativeScriptRouterModule } from "nativescript-angular/router";

import { HubComponent } from "./hub.component";
import { FeaturedComponent } from "./featured.component";
import { ItemComponent } from "./item.component";
import { BrowseComponent } from "./browse.component";
import { CategoryComponent } from "./category.component";
import { SearchComponent } from "./search.component";

const routes: Routes = [
    { path: "", redirectTo: "/hub", pathMatch: "full" },
    { path: "hub", component: HubComponent },
    { path: "featured", component: FeaturedComponent },
    { path: "item", component: ItemComponent },
    { path: "browse", component: BrowseComponent },
    { path: "category", component: CategoryComponent },
    { path: "search", component: SearchComponent },
];

@NgModule({
    imports: [NativeScriptRouterModule.forRoot(routes)],
    exports: [NativeScriptRouterModule]
})
export class AppRoutingModule { }
import { NgModule, NO_ERRORS_SCHEMA } from "@angular/core";
import { NativeScriptModule } from "nativescript-angular/nativescript.module";

import { AppRoutingModule } from "./app-routing.module";
import { AppComponent } from "./app.component";
import { HubComponent } from "./hub.component";
import { FeaturedComponent } from "./featured.component";
import { ItemComponent } from "./item.component";
import { BrowseComponent } from "./browse.component";
import { CategoryComponent } from "./category.component";
import { SearchComponent } from "./search.component";

@NgModule({
    bootstrap: [
        AppComponent
    ],
    imports: [
        NativeScriptModule,
        AppRoutingModule
    ],
    declarations: [
        AppComponent,
        HubComponent,
        FeaturedComponent,
        ItemComponent,
        BrowseComponent,
        CategoryComponent,
        SearchComponent,
    ],
    schemas: [
        NO_ERRORS_SCHEMA
    ]
})
export class AppModule { }
import { Component } from "@angular/core";

@Component({
    selector: "ns-app",
    templateUrl: "app.component.html"
})
export class AppComponent { }
<GridLayout>
    <router-outlet></router-outlet>
</GridLayout>
import { Component, OnInit } from "@angular/core";

@Component({
    selector: "Hub",
    templateUrl: "./hub.component.html",
    styleUrls: ['./hub.component.css']
})
export class HubComponent implements OnInit {

    constructor() {
    }

    ngOnInit(): void {
    }
}
<ScrollView class="page">
    <StackLayout class="home-panel">
        <Label class="h1 text-center text-uppercase" text="hub"></Label>
        <Button class="btn btn-primary" text="Featured" [nsRouterLink]="['/featured']"></Button>
        <Button class="btn btn-primary" text="Browse" [nsRouterLink]="['/browse']"></Button>
        <Button class="btn btn-primary" text="Search" [nsRouterLink]="['/search']"></Button>
    </StackLayout>
</ScrollView>
import { Component, OnInit } from "@angular/core";
import { Location } from "@angular/common";

@Component({
    selector: "Featured",
    templateUrl: "./featured.component.html",
    styleUrls: ['./featured.component.css']
})
export class FeaturedComponent implements OnInit {

    constructor(private location: Location) {
    }

    ngOnInit(): void {
    }

    goBack(): void {
        this.location.back();
    }
}
<ScrollView class="page">
    <StackLayout class="home-panel">
        <Label class="h1 text-center text-uppercase" text="FEATURED"></Label>
        <Button class="btn btn-primary" text="Item" [nsRouterLink]="['/item']"></Button>
        <Button class="btn btn-primary" text="Back" (tap)="goBack()"></Button>
    </StackLayout>
</ScrollView>
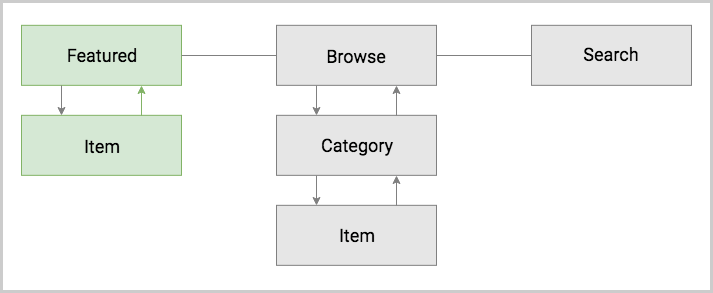
Forward Navigation
Forward navigation can be also called downward navigation since you are going down in your navigation hierarchy. In a NativeScript Angular app you would use a page-router-outlet to do this type of navigation.

Using a page-router-outlet comes with the added benefit of using the ActionBar widget in your component. On iOS, the widget automatically adds a back button when navigated to a second page. On Android, the page-router-outlet benefits from the hardware back button, which navigates back your components. Check out the playground demo below the code sample.
import { NgModule } from "@angular/core";
import { Routes } from "@angular/router";
import { NativeScriptRouterModule } from "nativescript-angular/router";

import { FeaturedComponent } from "./featured.component";
import { ItemComponent } from "./item.component";

const routes: Routes = [
    { path: "", redirectTo: "/featured", pathMatch: "full" },
    { path: "featured", component: FeaturedComponent },
    { path: "item", component: ItemComponent }
];

@NgModule({
    imports: [NativeScriptRouterModule.forRoot(routes)],
    exports: [NativeScriptRouterModule]
})
export class AppRoutingModule { }
import { NgModule, NO_ERRORS_SCHEMA } from "@angular/core";
import { NativeScriptModule } from "nativescript-angular/nativescript.module";

import { AppRoutingModule } from "./app-routing.module";
import { AppComponent } from "./app.component";
import { FeaturedComponent } from "./featured.component";
import { ItemComponent } from "./item.component";

@NgModule({
    bootstrap: [
        AppComponent
    ],
    imports: [
        NativeScriptModule,
        AppRoutingModule
    ],
    declarations: [
        AppComponent,
        FeaturedComponent,
        ItemComponent,
    ],
    schemas: [
        NO_ERRORS_SCHEMA
    ]
})
export class AppModule { }
import { Component } from "@angular/core";

@Component({
    selector: "ns-app",
    templateUrl: "app.component.html"
})
export class AppComponent { }
<page-router-outlet></page-router-outlet>
import { Component, OnInit } from "@angular/core";
import { RouterExtensions } from "nativescript-angular/router";

@Component({
    selector: "Featured",
    templateUrl: "./featured.component.html",
    styleUrls: ['./featured.component.css']
})
export class FeaturedComponent implements OnInit {

    constructor(private routerExtensions: RouterExtensions) {
    }

    ngOnInit(): void {
    }
}
<ActionBar title="Featured" class="action-bar"></ActionBar>

<ScrollView class="page">
    <StackLayout class="home-panel">
        <Button class="btn btn-primary" text="Item" [nsRouterLink]="['/item']"></Button>
    </StackLayout>
</ScrollView>
import { Component, OnInit } from "@angular/core";

@Component({
    selector: "Item",
    templateUrl: "./item.component.html",
    styleUrls: ['./item.component.css']
})
export class ItemComponent implements OnInit {

    constructor() {
    }

    ngOnInit(): void {
    }
}
<ActionBar title="Item" class="action-bar"></ActionBar>

<ScrollView class="page">
    <StackLayout class="home-panel">

    </StackLayout>
</ScrollView>
Backward Navigation
It can also be called upward navigation since you are going up in your navigation hierarchy. This type of navigation represents the opposite direction of the forward navigation. To force a navigation back to the previous route, simply call the back() method of the RouterExtensions. Here is an example of how this can be done in the item.component:
import { Component, OnInit } from "@angular/core";
import { RouterExtensions } from "nativescript-angular/router";

@Component({
    selector: "Item",
    templateUrl: "./item.component.html",
    styleUrls: ['./item.component.css']
})
export class ItemComponent implements OnInit {

    constructor(private routerExtensions: RouterExtensions) {
    }

    ngOnInit(): void {
    }

    goBack(): void {
        this.routerExtensions.back();
    }
}
<ActionBar title="Item" class="action-bar"></ActionBar>

<ScrollView class="page">
    <StackLayout class="home-panel">
        <Button class="btn btn-primary" text="Back" (tap)="goBack()"></Button>
    </StackLayout>
</ScrollView>
Lateral Navigation
Implementing lateral navigation in NativeScript usually means to implement sibling router outlets in your navigation and provide means to the user to switch between them. This is usually enabled through specific navigation components. These include BottomNavigation, Tabs, SideDrawer, Modal View, and even the page-router-outlet each providing a unique mobile navigation pattern.
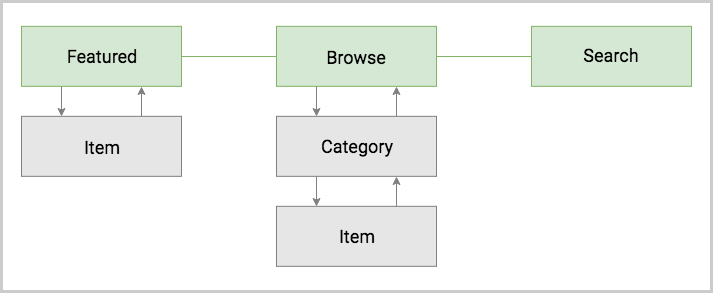
Hub Navigation
The most simple and straight forward way to implement lateral navigation is the hub navigation pattern. It consists of a screen, called a hub, that holds navigation buttons leading to different features. In essence, this pattern uses the same mechanism of forward navigation for lateral navigation. In NativeScript you can implement this with a page-router-outlet and have one Component serve as the hub screen.
import { NgModule } from "@angular/core";
import { Routes } from "@angular/router";
import { NativeScriptRouterModule } from "nativescript-angular/router";

import { HubComponent } from "./hub.component";
import { FeaturedComponent } from "./featured.component";
import { ItemComponent } from "./item.component";
import { BrowseComponent } from "./browse.component";
import { CategoryComponent } from "./category.component";
import { SearchComponent } from "./search.component";

const routes: Routes = [
    { path: "", redirectTo: "/hub", pathMatch: "full" },
    { path: "hub", component: HubComponent },
    { path: "featured", component: FeaturedComponent },
    { path: "item", component: ItemComponent },
    { path: "browse", component: BrowseComponent },
    { path: "category", component: CategoryComponent },
    { path: "search", component: SearchComponent },
];

@NgModule({
    imports: [NativeScriptRouterModule.forRoot(routes)],
    exports: [NativeScriptRouterModule]
})
export class AppRoutingModule { }
import { NgModule, NO_ERRORS_SCHEMA } from "@angular/core";
import { NativeScriptModule } from "nativescript-angular/nativescript.module";

import { AppRoutingModule } from "./app-routing.module";
import { AppComponent } from "./app.component";
import { HubComponent } from "./hub.component";
import { FeaturedComponent } from "./featured.component";
import { ItemComponent } from "./item.component";
import { BrowseComponent } from "./browse.component";
import { CategoryComponent } from "./category.component";
import { SearchComponent } from "./search.component";

@NgModule({
    bootstrap: [
        AppComponent
    ],
    imports: [
        NativeScriptModule,
        AppRoutingModule
    ],
    declarations: [
        AppComponent,
        HubComponent,
        FeaturedComponent,
        ItemComponent,
        BrowseComponent,
        CategoryComponent,
        SearchComponent,
    ],
    schemas: [
        NO_ERRORS_SCHEMA
    ]
})
export class AppModule { }
import { Component } from "@angular/core";

@Component({
    selector: "ns-app",
    templateUrl: "app.component.html"
})
export class AppComponent { }
<page-router-outlet></page-router-outlet>
import { Component, OnInit } from "@angular/core";

@Component({
    selector: "Hub",
    templateUrl: "./hub.component.html",
    styleUrls: ['./hub.component.css']
})
export class HubComponent implements OnInit {

    constructor() {
    }

    ngOnInit(): void {
    }
}
<ActionBar title="Hub" class="action-bar"></ActionBar>

<ScrollView class="page">
    <StackLayout class="home-panel">
        <Button class="btn btn-primary" text="Featured" [nsRouterLink]="['/featured']"></Button>
        <Button class="btn btn-primary" text="Browse" [nsRouterLink]="['/browse']"></Button>
        <Button class="btn btn-primary" text="Search" [nsRouterLink]="['/search']"></Button>
    </StackLayout>
</ScrollView>
import { Component, OnInit } from "@angular/core";
import { RouterExtensions } from "nativescript-angular/router";

@Component({
    selector: "Featured",
    templateUrl: "./featured.component.html",
    styleUrls: ['./featured.component.css']
})
export class FeaturedComponent implements OnInit {

    constructor(private routerExtensions: RouterExtensions) {
    }

    ngOnInit(): void {
    }

    goBack(): void {
        this.routerExtensions.back();
    }
}
<ActionBar title="Featured" class="action-bar"></ActionBar>

<ScrollView class="page">
    <StackLayout class="home-panel">
        <Button class="btn btn-primary" text="Item" [nsRouterLink]="['/item']"></Button>
        <Button class="btn btn-primary" text="Back" (tap)="goBack()"></Button>
    </StackLayout>
</ScrollView>
BottomNavigation & Tabs Navigation
The TabView component enables the user to arbitrarily navigate between several UI containers at the same level. A key feature of this component is that it keeps the state of the containers that are not visible. This means that when the user comes back to a previous tab, the data, scroll position and navigation state should be like they left them. Here is a diagram that demonstrates how the navigation schema can be implemented with a BottomNavigation (or alternatively with Tabs).

The BottomNavigation container provides its lateral navigation logic automatically by providing the user with tabs which they can select. To set up a BottomNavigation you need to simply declare the UI of each container via a TabItemContent and set the title and icon via corresponding tabStripItem (details on the basic structure here). Each separate UI container is represented by the TabContentItem component. As with other containers, you can enable forw.ard and backward navigation inside each of them by embedding a page-router-outlet in it. In this case we need to use three sibling outlets. The way to do this with the Angular router is to use named outlets. Each of our outlets will be named with the name of the feature that it represents.
The BottomNavigation widget also provides two important features connected to lateral navigation:
- selectedIndex property - use this property to programmatically navigate between the tabs.
- selectedIndexChanged event - use this event to handle navigations between tabs done by the user.
Here is a code sample of the BottomNavigation declaration that matches the diagram above. Check out the complete playground demo below the code sample.
import { NgModule } from "@angular/core";
import { Routes } from "@angular/router";
import { NativeScriptRouterModule } from "nativescript-angular/router";

import { FeaturedComponent } from "./featured.component";
import { ItemComponent } from "./item.component";
import { BrowseComponent } from "./browse.component";
import { CategoryComponent } from "./category.component";
import { SearchComponent } from "./search.component";

const routes: Routes = [
    { path: "", redirectTo: "/(featured:featured//browse:browse//search:search)", pathMatch: "full" },

    { path: "featured", component: FeaturedComponent, outlet: "featured" },
    { path: "item", component: ItemComponent, outlet: "featured" },

    { path: "browse", component: BrowseComponent, outlet: "browse" },
    { path: "category", component: CategoryComponent, outlet: "browse" },
    { path: "item", component: ItemComponent, outlet: "browse" },

    { path: "search", component: SearchComponent, outlet: "search" },
];

@NgModule({
    imports: [NativeScriptRouterModule.forRoot(routes)],
    exports: [NativeScriptRouterModule]
})
export class AppRoutingModule { }
import { NgModule, NO_ERRORS_SCHEMA } from "@angular/core";
import { NativeScriptModule } from "nativescript-angular/nativescript.module";

import { AppRoutingModule } from "./app-routing.module";
import { AppComponent } from "./app.component";
import { FeaturedComponent } from "./featured.component";
import { ItemComponent } from "./item.component";
import { BrowseComponent } from "./browse.component";
import { CategoryComponent } from "./category.component";
import { SearchComponent } from "./search.component";

@NgModule({
    bootstrap: [
        AppComponent
    ],
    imports: [
        NativeScriptModule,
        AppRoutingModule
    ],
    declarations: [
        AppComponent,
        FeaturedComponent,
        ItemComponent,
        BrowseComponent,
        CategoryComponent,
        SearchComponent,
    ],
    schemas: [
        NO_ERRORS_SCHEMA
    ]
})
export class AppModule { }
import { Component } from "@angular/core";
import { SelectedIndexChangedEventData } from "tns-core-modules/ui/tab-view";

@Component({
    selector: "ns-app",
    templateUrl: "app.component.html"
})
export class AppComponent {

    onSelectedIndexChanged(args: SelectedIndexChangedEventData): void {
        console.log(`Selected index has changed ( Old index: ${args.oldIndex} New index: ${args.newIndex} )`);
    }

}
<BottomNavigation selectedIndex="1">
<!-- The bottom tab UI is created via TabStrip (the container) and TabStripItem (for each tab)-->
<TabStrip>
<TabStripItem>
<Label text="Home"></Label>
<!-- <Image src="font://" class="fas"></Image> -->
</TabStripItem>
<TabStripItem class="special">
<Label text="Account"></Label>
<!-- <Image src="font://" class="fas"></Image> -->
</TabStripItem>
<TabStripItem class="special">
<Label text="Search"></Label>
<!-- <Image src="font://" class="fas"></Image> -->
</TabStripItem>
</TabStrip>
<!-- The number of TabContentItem components should corespond to the number of TabStripItem components -->
<TabContentItem>
<page-router-outlet name="featured"></page-router-outlet>
</TabContentItem>
<TabContentItem>
<page-router-outlet name="browse"></page-router-outlet>
</TabContentItem>
<TabContentItem>
<page-router-outlet name="search"></page-router-outlet>
</TabContentItem>
</BottomNavigation>
import { Component, OnInit } from "@angular/core";

@Component({
    selector: "Featured",
    templateUrl: "./featured.component.html",
    styleUrls: ['./featured.component.css']
})
export class FeaturedComponent implements OnInit {

    constructor() {
    }

    ngOnInit(): void {
    }
}
<ActionBar title="Featured" class="action-bar"></ActionBar>

<ScrollView class="page">
    <StackLayout class="home-panel">
        <Button class="btn btn-primary" text="Item" [nsRouterLink]="['../item']"></Button>
    </StackLayout>
</ScrollView>
Note: In the current scenario the Search feature has only one page and it's possible to implement it directly in the
TabContentItemtag without embedding apage-router-outlet. However, in this case there won't be a navigation controller in theTabContentItemcontainer and therefore, noActionBar.
Modal View Navigation
Opening a new navigation controller as a full screen modal view is a very common mobile navigation pattern. In this context opening the modal view represents lateral navigation to a new feature. You can then leverage the embedded page-router-outlet to navigate forward and backward in this feature. Closing the modal will navigate laterally back to where the modal view was opened from. Below is a diagram that displays how the navigation schema can be implemented using modal views.
Note: Unlike the
BottomNavigationcomponent, the state of the modal view isn't kept when navigating away, i.e. closing the modal.

Opening a modal view in NativeScript Angular is done by injecting the ModalDialogService in your component and using its showModal() method. This method has two parameters - a component and an options object. The component you pass to the showModal() method will become the root of the modal view UI container. The navigation to this component is lateral, not forward and you are navigating to it without the router. It doesn't have a corresponding route to it and you can't register it as a route in your routes config, but you have to register it manually as an Angular Entry Component in your module.
Note: Components that are registered as routes are automatically registered as entry components by Angular. You don't register them manually.
Once the modal view is opened it will render the component's UI. To implement the diagram above, we have to implement forward navigation inside the modal. We do this by having a page-router-outlet in the component's template and using the ngOnInit hook of the component to navigate to the first route in the modal. We are also applying a name to the outlet, because we are going to have two modals, so their outlets will be siblings. In general, we recommend that you always name router outlets inside modal views.
Closing a modal view can be done either by calling the closeCallback() method of the injected params or by getting a NativeScript View and calling its closeModal() method.
Take a look at the Modal View article for more information.
The following code sample demonstrates how you can implement the Search modal view and page from the diagram above. Check out the complete playground demo below the code sample.
import { NgModule } from "@angular/core";
import { Routes } from "@angular/router";
import { NativeScriptRouterModule } from "nativescript-angular/router";

import { FeaturedComponent } from "./featured.component";
import { ItemComponent } from "./item.component";
import { BrowseComponent } from "./browse.component";
import { CategoryComponent } from "./category.component";
import { SearchComponent } from "./search.component";

const routes: Routes = [
    { path: "", redirectTo: "/featured", pathMatch: "full" },

    {
        path: "featured", component: FeaturedComponent, children: [
            { path: "browse", component: BrowseComponent, outlet: "browse" },
            { path: "category", component: CategoryComponent, outlet: "browse" },
            { path: "item", component: ItemComponent, outlet: "browse" },

            { path: "search", component: SearchComponent, outlet: "search" },
        ]
    },
    { path: "item", component: ItemComponent },
];

@NgModule({
    imports: [NativeScriptRouterModule.forRoot(routes)],
    exports: [NativeScriptRouterModule]
})
export class AppRoutingModule { }
import { NgModule, NO_ERRORS_SCHEMA } from "@angular/core";
import { NativeScriptModule } from "nativescript-angular/nativescript.module";

import { AppRoutingModule } from "./app-routing.module";
import { AppComponent } from "./app.component";
import { FeaturedComponent } from "./featured.component";
import { ItemComponent } from "./item.component";
import { BrowseComponent } from "./browse.component";
import { CategoryComponent } from "./category.component";
import { SearchComponent } from "./search.component";

import { BrowseRootComponent } from "./browse-root.component";
import { SearchRootComponent } from "./search-root.component";

@NgModule({
    bootstrap: [
        AppComponent
    ],
    imports: [
        NativeScriptModule,
        AppRoutingModule
    ],
    entryComponents: [
        BrowseRootComponent,
        SearchRootComponent,
    ],
    declarations: [
        AppComponent,
        FeaturedComponent,
        ItemComponent,
        BrowseComponent,
        CategoryComponent,
        SearchComponent,
        BrowseRootComponent,
        SearchRootComponent,
    ],
    schemas: [
        NO_ERRORS_SCHEMA
    ]
})
export class AppModule { }
import { Component } from "@angular/core";
import { SelectedIndexChangedEventData } from "tns-core-modules/ui/bottom-navigation";

@Component({
    selector: "ns-app",
    templateUrl: "app.component.html"
})
export class AppComponent {}
<page-router-outlet></page-router-outlet>
import { Component, OnInit, ViewContainerRef } from "@angular/core";
import { ModalDialogOptions, ModalDialogService } from "nativescript-angular/modal-dialog";

import { BrowseRootComponent } from "./browse-root.component";
import { SearchRootComponent } from "./search-root.component";

@Component({
    selector: "Featured",
    templateUrl: "./featured.component.html",
    styleUrls: ['./featured.component.css']
})
export class FeaturedComponent implements OnInit {

    constructor(private modalService: ModalDialogService, private vcRef: ViewContainerRef) {
    }

    ngOnInit(): void {
    }

    openModalBrowse(): void {
        const options: ModalDialogOptions = {
            fullscreen: true,
            viewContainerRef: this.vcRef
        };

        this.modalService.showModal(BrowseRootComponent, options);
    }

    openModalSearch(): void {
        const options: ModalDialogOptions = {
            fullscreen: true,
            viewContainerRef: this.vcRef
        };

        this.modalService.showModal(SearchRootComponent, options);
    }
}
<ActionBar title="Featured" class="action-bar"></ActionBar>

<ScrollView class="page">
    <StackLayout class="home-panel">
        <Button class="btn btn-primary" text="Item" [nsRouterLink]="['../item']"></Button>
        <Button class="btn btn-primary" text="Modal Browse" (tap)="openModalBrowse()"></Button>
        <Button class="btn btn-primary" text="Modal Search" (tap)="openModalSearch()"></Button>
    </StackLayout>
</ScrollView>
import { Component, OnInit } from "@angular/core";
import { ActivatedRoute } from "@angular/router";
import { RouterExtensions } from "nativescript-angular/router";

@Component({
    selector: "SearchRoot",
    templateUrl: "./search-root.component.html"
})
export class SearchRootComponent implements OnInit {

    constructor(private _routerExtensions: RouterExtensions, private activeRoute: ActivatedRoute) {
    }

    ngOnInit(): void {
        this._routerExtensions.navigate([{ outlets: { search: ["search"] } }], { relativeTo: this.activeRoute });
    }
}
<page-router-outlet name="search"></page-router-outlet>
import { Component, OnInit } from "@angular/core";
import { View } from "tns-core-modules/ui/core/view"

@Component({
    selector: "Search",
    templateUrl: "./search.component.html",
    styleUrls: ['./search.component.css']
})
export class SearchComponent implements OnInit {

    constructor() {
    }

    ngOnInit(): void {
    }

    closeModal(scrollView: View): void {
        scrollView.closeModal();
    }
}
<ActionBar title="Search" class="action-bar"></ActionBar>

<ScrollView #scrollView class="page">
    <StackLayout class="home-panel">
        <Button class="btn btn-primary" text="Close Modal" (tap)="closeModal(scrollView)"></Button>
    </StackLayout>
</ScrollView>
Note: In the current scenario the Search feature has only one page and it's possible to implement it directly in the modal view without embedding a
page-router-outlet. However, in this case there won't be a navigation controller in the modal view and therefore, noActionBar.
SideDrawer Navigation
The SideDrawer component is part of NativeScript UI's built-in components. It enables the user to open a hidden view, i.e. drawer, containing navigation controls, or settings from the sides of the screen. There are a lot of navigation patterns that can be implemented using a SideDrawer. A typical usage would be to add UI controls and have them do one of two things:
- Forward navigation - navigate in a
page-router-outlet. - Lateral navigation - open a modal view.
The simplest navigation pattern that you can implement is again the hub navigation pattern, but this time with the SideDrawer serving as the hub.

The component itself doesn't provide navigation logic automatically like the BottomNavigation. Instead, it is built with more freedom in mind and lets you customize its content. It exposes two UI containers with two directives - tkDrawerContent houses the UI of the hidden side view and the tkMainContent holds the UI that will be shown on the screen. To implement the diagram above, you can embed a page-router-outlet in the main content container. In the hidden drawer content you can have three buttons. Each of them will navigate to one of the three features. Check out the complete playground demo below the code sample.
import { NgModule } from "@angular/core";
import { Routes } from "@angular/router";
import { NativeScriptRouterModule } from "nativescript-angular/router";

import { FeaturedComponent } from "./featured.component";
import { ItemComponent } from "./item.component";
import { BrowseComponent } from "./browse.component";
import { CategoryComponent } from "./category.component";
import { SearchComponent } from "./search.component";

const routes: Routes = [
    { path: "", redirectTo: "/featured", pathMatch: "full" },
    { path: "featured", component: FeaturedComponent },
    { path: "item", component: ItemComponent },
    { path: "browse", component: BrowseComponent },
    { path: "category", component: CategoryComponent },
    { path: "search", component: SearchComponent },
];

@NgModule({
    imports: [NativeScriptRouterModule.forRoot(routes)],
    exports: [NativeScriptRouterModule]
})
export class AppRoutingModule { }
import { NgModule, NO_ERRORS_SCHEMA } from "@angular/core";
import { NativeScriptModule } from "nativescript-angular/nativescript.module";
import { NativeScriptUISideDrawerModule } from "nativescript-ui-sidedrawer/angular";

import { AppRoutingModule } from "./app-routing.module";
import { AppComponent } from "./app.component";
import { FeaturedComponent } from "./featured.component";
import { ItemComponent } from "./item.component";
import { BrowseComponent } from "./browse.component";
import { CategoryComponent } from "./category.component";
import { SearchComponent } from "./search.component";

@NgModule({
    bootstrap: [
        AppComponent
    ],
    imports: [
        NativeScriptModule,
        AppRoutingModule,
        NativeScriptUISideDrawerModule
    ],
    declarations: [
        AppComponent,
        FeaturedComponent,
        ItemComponent,
        BrowseComponent,
        CategoryComponent,
        SearchComponent,
    ],
    schemas: [
        NO_ERRORS_SCHEMA
    ]
})
export class AppModule { }
import { Component, ViewChild } from "@angular/core";
import { RouterExtensions } from "nativescript-angular/router";
import { RadSideDrawerComponent } from "nativescript-ui-sidedrawer/angular";

@Component({
    selector: "ns-app",
    templateUrl: "app.component.html"
})
export class AppComponent {
    @ViewChild(RadSideDrawerComponent) sideDrawerComponent: RadSideDrawerComponent;

    constructor(private routerExtensions: RouterExtensions) { }

    navigateToFeatured(): void {
        this.routerExtensions.navigate(["/featured"], { clearHistory: true });
        this.sideDrawerComponent.sideDrawer.closeDrawer();
    }

    navigateToBrowse(): void {
        this.routerExtensions.navigate(["/browse"], { clearHistory: true });
        this.sideDrawerComponent.sideDrawer.closeDrawer();
    }

    navigateToSearch(): void {
        this.routerExtensions.navigate(["/search"], { clearHistory: true });
        this.sideDrawerComponent.sideDrawer.closeDrawer();
    }
}
<RadSideDrawer #sideDrawer>
    <StackLayout tkDrawerContent class="sidedrawer-left">
        <StackLayout class="sidedrawer-header"></StackLayout>
        <StackLayout class="sidedrawer-content">
            <StackLayout class="sidedrawer-list-item">
                <Button class="btn btn-primary sidedrawer-list-item-text"
                    text="Featured" (tap)="navigateToFeatured()"></Button>
            </StackLayout>
            <StackLayout class="sidedrawer-list-item">
                <Button class="btn btn-primary sidedrawer-list-item-text"
                    text="Browse" (tap)="navigateToBrowse()"></Button>
            </StackLayout>
            <StackLayout class="sidedrawer-list-item">
                <Button class="btn btn-primary sidedrawer-list-item-text"
                    text="Search" (tap)="navigateToSearch()"></Button>
            </StackLayout>
        </StackLayout>
    </StackLayout>

    <page-router-outlet tkMainContent></page-router-outlet>
</RadSideDrawer>
Note: To implement the lateral navigation schema correctly in this case, we had to navigate to each side feature using the
clearHistoryoption. This is to ensure that there will be no forward and backward navigation between features.
An alternative navigation pattern for the SideDrawer would be to have the main content hold only one feature and navigate to the other two laterally using modal views. See the playground demo below the code sample for complete example.

import { NgModule } from "@angular/core";
import { Routes } from "@angular/router";
import { NativeScriptRouterModule } from "nativescript-angular/router";

import { FeaturedComponent } from "./featured.component";
import { ItemComponent } from "./item.component";
import { BrowseComponent } from "./browse.component";
import { CategoryComponent } from "./category.component";
import { SearchComponent } from "./search.component";

const routes: Routes = [
    { path: "", redirectTo: "/featured", pathMatch: "full" },
    { path: "featured", component: FeaturedComponent },
    { path: "item", component: ItemComponent },

    { path: "browse", component: BrowseComponent, outlet: "browse" },
    { path: "category", component: CategoryComponent, outlet: "browse" },
    { path: "item", component: ItemComponent, outlet: "browse" },

    { path: "search", component: SearchComponent, outlet: "search" },
];

@NgModule({
    imports: [NativeScriptRouterModule.forRoot(routes)],
    exports: [NativeScriptRouterModule]
})
export class AppRoutingModule { }
import { NgModule, NO_ERRORS_SCHEMA } from "@angular/core";
import { NativeScriptModule } from "nativescript-angular/nativescript.module";
import { NativeScriptUISideDrawerModule } from "nativescript-ui-sidedrawer/angular";

import { AppRoutingModule } from "./app-routing.module";
import { AppComponent } from "./app.component";
import { FeaturedComponent } from "./featured.component";
import { ItemComponent } from "./item.component";
import { BrowseComponent } from "./browse.component";
import { CategoryComponent } from "./category.component";
import { SearchComponent } from "./search.component";

import { BrowseRootComponent } from "./browse-root.component";
import { SearchRootComponent } from "./search-root.component";

@NgModule({
    bootstrap: [
        AppComponent
    ],
    imports: [
        NativeScriptModule,
        AppRoutingModule,
        NativeScriptUISideDrawerModule
    ],
    entryComponents: [
        BrowseRootComponent,
        SearchRootComponent,
    ],
    declarations: [
        AppComponent,
        FeaturedComponent,
        ItemComponent,
        BrowseComponent,
        CategoryComponent,
        SearchComponent,
        BrowseRootComponent,
        SearchRootComponent,
    ],
    schemas: [
        NO_ERRORS_SCHEMA
    ]
})
export class AppModule { }
import { Component, OnInit, ViewContainerRef, ViewChild } from "@angular/core";
import { ModalDialogOptions, ModalDialogService } from "nativescript-angular/modal-dialog";
import { RouterExtensions } from "nativescript-angular/router";
import { RadSideDrawerComponent } from "nativescript-ui-sidedrawer/angular";

import { BrowseRootComponent } from "./browse-root.component";
import { SearchRootComponent } from "./search-root.component";

@Component({
    selector: "ns-app",
    templateUrl: "app.component.html"
})
export class AppComponent {
    @ViewChild(RadSideDrawerComponent) sideDrawerComponent: RadSideDrawerComponent;

    constructor(private routerExtensions: RouterExtensions, private modalService: ModalDialogService, private vcRef: ViewContainerRef) {
    }

    navigateToFeatured(): void {
        this.routerExtensions.navigate(["/featured"], { clearHistory: true });
        this.sideDrawerComponent.sideDrawer.closeDrawer();
    }

    openModalBrowse(): void {
        const options: ModalDialogOptions = {
            fullscreen: true,
            viewContainerRef: this.vcRef
        };

        this.modalService.showModal(BrowseRootComponent, options);
    }

    openModalSearch(): void {
        const options: ModalDialogOptions = {
            fullscreen: true,
            viewContainerRef: this.vcRef
        };

        this.modalService.showModal(SearchRootComponent, options);
    }
}
<RadSideDrawer #sideDrawer>
    <StackLayout tkDrawerContent class="sidedrawer-left">
        <StackLayout class="sidedrawer-header"></StackLayout>
        <StackLayout class="sidedrawer-content">
            <StackLayout class="sidedrawer-list-item">
                <Button class="btn btn-primary sidedrawer-list-item-text"
                    text="Featured" (tap)="navigateToFeatured()"></Button>
            </StackLayout>
            <StackLayout class="sidedrawer-list-item">
                <Button class="btn btn-primary sidedrawer-list-item-text"
                    text="Browse" (tap)="openModalBrowse()"></Button>
            </StackLayout>
            <StackLayout class="sidedrawer-list-item">
                <Button class="btn btn-primary sidedrawer-list-item-text"
                    text="Search" (tap)="openModalSearch()"></Button>
            </StackLayout>
        </StackLayout>
    </StackLayout>

    <page-router-outlet tkMainContent></page-router-outlet>
</RadSideDrawer>
Take a look at the SideDrawer docs for more information about the component.