RadListView Item Templates
By default when using the RadListView
in order for the items from its data source to be visualized all that you need to do is declare your own itemTemplate
and set it to the desired UI View. This will make sure that each of the business objects of the passed to the items
property are visualized using that template, but there are scenarios where you may want to use different template for specific business objects (different sections, important business objects, more detailed objects etc.). IN such scenarios the the itemTemplates
can be used.
Using Multiple Item Templates
In order to setup the RadListView
to use different templates for its items representation you will need to:
- Create a function or pass a string representation of a "property" by which the template for each business object will be determined. This is done by setting the
itemTemplateSelector
property - Create multiple separate
ng-template
, add them to theitemTemplates
collection property and set theirtkTemplateKey
to the desired unique template identifier. ThetkTemplateKey
is a custom directive and is what will be used to do the comparison in theitemTemplateSelector
Example 1: Setting up itemTemplateSelector
and itemTemplates
In the code snippets bellow we are declaring multiple <ng-template></ng-template>
instances in the HTML. After that we are creating a function in our Angular Component
that simply returns the property of the business object that will be used to determine FFthe template of its item representation and finally we are binding that function to the itemTemplateSelector
property:
<RadListView [items]="dataItems" [itemTemplateSelector]="templateSelector">
<ng-template tkListItemTemplate let-item="item">
<StackLayout orientation="vertical">
<Label [text]="item.name" class="nameLabel"></Label>
<Label [text]="item.type" class="typeLabel middleLabel"></Label>
<Label [text]="item.description" class="descriptionLabel"></Label>
</StackLayout>
</ng-template>
<ng-template tkTemplateKey="start" let-item="item">
<StackLayout orientation="vertical" class="blackStackLayout">
<Label [text]="item.name" class="nameLabel yellowText"></Label>
<Label [text]="item.type" class="typeLabel yellowText middleLabel"></Label>
<Label [text]="item.description" class="descriptionLabel yellowText"></Label>
</StackLayout>
</ng-template>
<ng-template tkTemplateKey="Red" let-item="item">
<StackLayout orientation="vertical" class="redStackLayout">
<Label [text]="item.name" class="nameLabel whiteText"></Label>
<Label [text]="item.type" class="typeLabel whiteText"></Label>
</StackLayout>
</ng-template>
<ng-template tkTemplateKey="green" let-item="item">
<StackLayout orientation="vertical" class="greenStackLayout">
<Label [text]="item.name" class="nameLabel whiteText"></Label>
<Label [text]="item.type" class="typeLabel whiteText"></Label>
</StackLayout>
</ng-template>
<ng-template tkTemplateKey="Blue" let-item="item">
<StackLayout orientation="vertical" class="blueStackLayout">
<Label [text]="item.name" class="nameLabel whiteText"></Label>
<Label [text]="item.type" class="typeLabel whiteText"></Label>
</StackLayout>
</ng-template>
<ng-template tkTemplateKey="End" let-item="item">
<StackLayout orientation="vertical" class="yellowStackLayout">
<Label [text]="item.name" class="nameLabel blackText"></Label>
<Label [text]="item.type" class="typeLabel blackText middleLabel"></Label>
<Label [text]="item.description" class="descriptionLabel blackText"></Label>
</StackLayout>
</ng-template>
</RadListView>
import { Component, OnInit } from "@angular/core";
import { ObservableArray } from "tns-core-modules/data/observable-array";
import { DataItem } from "../dataItem";
import { DataItemService } from "../dataItem.service";
@Component({
moduleId: module.id,
selector: "tk-listview-multiple-templates",
providers: [DataItemService],
templateUrl: "listview-multiple-templates.component.html",
styleUrls: ["listview-multiple-templates.component.css"]
})
export class ListViewMultipleTemplatesComponent implements OnInit {
private _dataItems: ObservableArray<DataItem>;
private _templateSelector: (item: DataItem, index: number, items: any) => string;
constructor(private _dataItemService: DataItemService) {
}
get dataItems(): ObservableArray<DataItem> {
return this._dataItems;
}
ngOnInit() {
this._dataItems = new ObservableArray();
this._templateSelector = this.templateSelectorFunction;
let itemsCount = 50;
for (let i = 0; i <= itemsCount; i++) {
this._dataItems.push(new DataItem(i, "Item " + i, "This is item description", undefined, undefined, undefined, undefined, this.getType(i, itemsCount)));
}
}
private getType(index: number, end: number): string {
let lastDigit = index % 10;
let type = index === 0 ? "start" : index === end ? "end" : undefined;
if (!type) {
type = lastDigit === 0 ? "default" : lastDigit <= 3 ? "red" : lastDigit <= 6 ? "blue" : lastDigit <= 9 ? "green" : "default";
}
return type;
}
get templateSelector(): (item: DataItem, index: number, items: any) => string {
return this._templateSelector;
}
set templateSelector(value: (item: DataItem, index: number, items: any) => string) {
this._templateSelector = value;
}
public templateSelectorFunction = (item: DataItem, index: number, items: any) => {
return item.type;
}
}
.nameLabel {
font-size: 20;
margin: 5;
}
.typeLabel {
font-size: 17;
margin: 5;
}
.middleLabel{
margin: 0 5 0 5;
}
.descriptionLabel {
font-size: 14;
margin: 5
}
.yellowText {
color: yellow;
}
.whiteText {
color: white;
}
.blackText {
color: black;
}
.blackStackLayout {
background-color: black;
}
.redStackLayout {
background-color: red;
}
.greenStackLayout {
background-color: green;
}
.blueStackLayout {
background-color: blue;
}
.yellowStackLayout {
background-color: yellow;
}
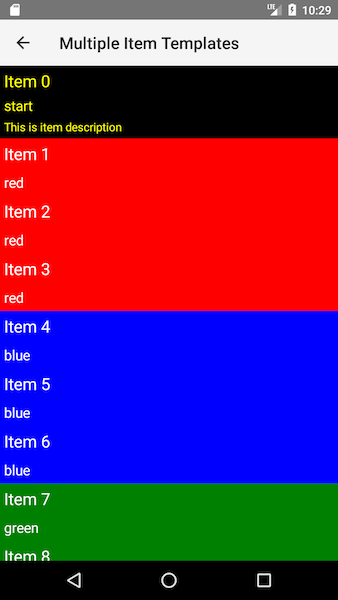
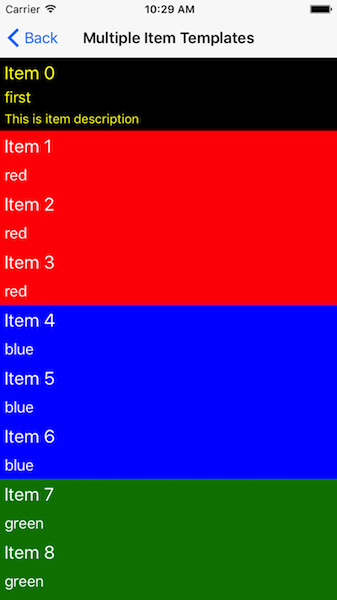
Figure 1: RadListView with multiple item templates:
References
Want to see this scenario in action? Check our SDK examples repo on GitHub. You will find this and many other practical examples with NativeScript UI.